Often Californians stop just at Lake Tahoe and not explore other lakes in the area. Next time you visit Tahoe, consider the Desolation wilderness area that is full of amazing mountain lakes.
There are multiple of trail heads to get into the Desolation Wilderness. The one we did is a very beginner friendly 13.5-mile loop.
And the best part is you get to take a dip in 8-different lakes.
1) Drive to South Lake Tahoe and stop at Pope Beach (or any beach of Lake Tahoe) to take a dip. We did swim for 45-mins. It was freezing cold and windy.
2) Camp overnight at Fallen Leaf campground (reserve at recreation.gov) at the footsteps of Fallen Leaf lake.
3) After wetting your feet (or swimming) at Fallen Leaf lake, next day morning, drive to Emerald Bay area and enter into Bay View Campground for theBay View trail parking lot. There are only few overnight spots. If you are not lucky to get a spot, just pay for one of the campground spots ($17 per night) that allows you to park the car overnight. On the memorial day weekend, we still managed to get a campground spot for parking. But, from June onwards the school summer vacation crowd will dominate the campgrounds. Plan ahead by booking at reservation.gov
The first two miles of the Bay View trail is uphill all the way to the top. First lake on the trail is Granite Lake.
4) Have lunch at the top of Bay View overlooking Emerald Bay, Lake Tahoe. And continue towards Velma lakes. Upper Velma is relatively small and there are not many spots to camp.
5) After upper velma lake continue towards Middle velma after crossing a river. Middle Velma is huge and has many flat surfaces for camping in the wilderness. These are backcountry grounds with no facilities. Overnight stay at Middle Velma – watch the sunset colors and gorgeous sunrise next day morning.
6) After taking a quick dip at Velma to freshen up in the morning, hike towards Fontanillis lake, one of the most beautiful lakes on the trail. Since we went in May the snow hasn’t fully melted and that added to the beauty of the scenery.
7) It rained immediately after we set up the tent, wonder if that’s the reason for no mosquitoes. We were told to expect lots of friendly bites. But, we got really lucky.
This part of the trail is really pretty with snowy mountains, puddles of water reflecting the peaks, gorgeous lakes and streams. In May there was still a good 1-mile stretch of snow on the trail.
Dicks Lake still had a layer of snow floating around.
8) After an early lunch break at Dicks lake, head towards Eagle lake and Eagle falls to finish up the hike.
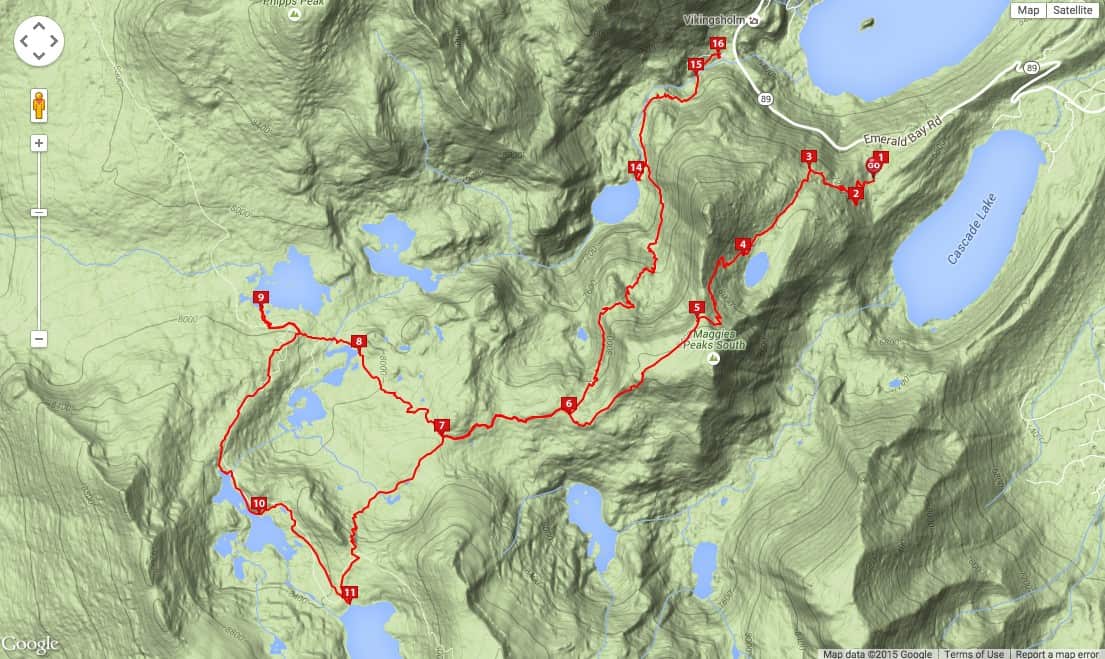
So, the Hike starts at Bay View and ends at Eagle Falls. There is a good one mile walk back to the parking lot at Bay View along Hwy. 89. At least you are walking along the view of Emerald Bay.
Practical Matters:
1) Book your backcountry permit at this link: http://www.recreation.gov/permits/map_of_Desolation_Wilderness/r/wildernessAreaMap.do?page=map&contractCode=NRSO&parkId=72202
2) Since it’s a backcountry camping, take toilet-paper/shovel
3) Be rain and mosquito ready
4) Take Sunscreen and shades (especially if you are walking on snow. Snow blinding is bad)
5) There were granite sections where it is easy to be lost. Take a good map, pay close attention to trail marking and follow the trail ducks if you are lost.
6) We were lost 3-times in the two-day hike and had to trace our way out. Apparently there were other hikers who were not lost at all. Too much chit-chatting and not paying attention I suppose.
Here is a map to give a overall idea, but get a better/detailed map before you head out. This map below is from here: